Before you can utilize the SkySlope Books integration with QuickBooks, there are just a few quick steps to take to ensure you're set up for success! Please note that this integration is specifically for the QuickBooks Online platform, not the desktop platform. In this article, we'll go over everything you need to know to set up the QuickBooks Online integration:
- Enabling the Integration
- Accessing the Integration Settings
- Bill Integration
- Invoice Integration
- Integration Settings
BEFORE YOU START: It’s highly recommended that you have your chart of accounts and list of products/services set up in both QuickBooks and SkySlope Books. If that hasn’t been set up yet, please contact your SkySlope Books Customer Success Manager or SkySlope Books Support to complete the setup.
Enabling the QuickBooks Online Integration
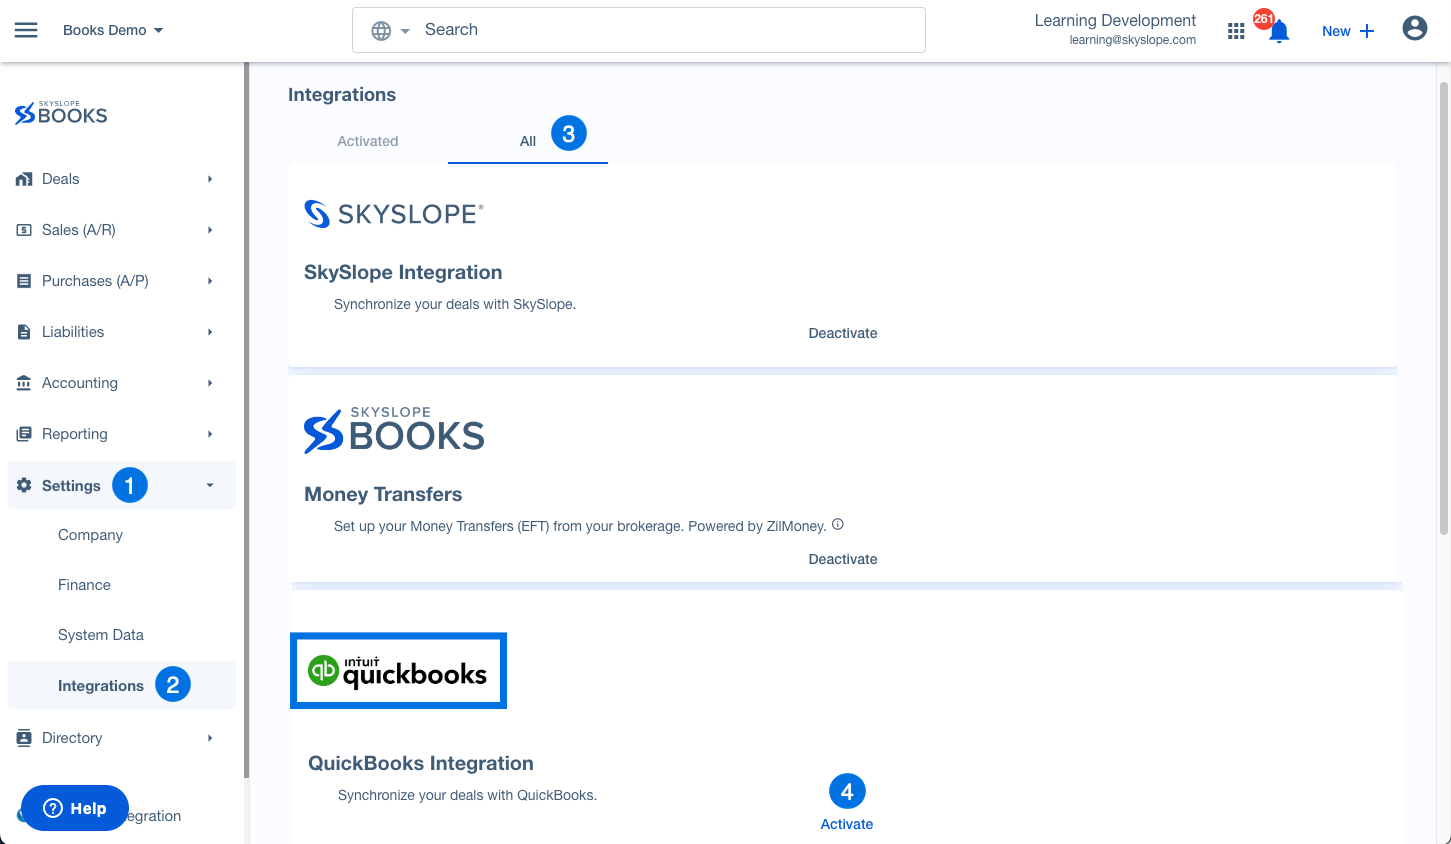
1. In the left menu, navigate to Settings. Then, go to the Integrations section. Once on the Integrations page, scroll down to locate QuickBooks. You may need to navigate to the All tab to locate integrations that have not yet been activated for your account. Click Activate to enable the QuickBooks integration.

2. You will be asked to confirm. Click Agree & Continue if you wish to move forward.

3. On the next page, click Get Started to connect QuickBooks to SkySlope Books.

4. Next, you will be prompted to log into your QuickBooks account.

5. After signing in, use the drop-down menu to select SkySlope for the integration. Then click Next.

6. After the integration has been activated, you have the option to Display in Main Navigation.

When you turn this on, you will be able to quickly access the QuickBooks Online integration from the main navigation menu in Books.

Manage Integration Settings
Once you've enabled the integration and logged in to connect QuickBooks to SkySlope Books, it's time to customize the integration to match your workflow.
To access the QuickBooks Online integration settings:
If displayed in the main navigation, simply click QuickBooks Integration to jump right to your integration settings.

If not displayed in the main navigation, navigate to Settings. Then, go to the Integrations section. Once on the Integrations page, scroll down to locate QuickBooks. Then click Open.

Now you can access the three sections of integration settings: Bill Integration, Invoice Integration, and Integration Settings.

Bill Integration
1. On the Bill Integration tab, the first thing you must do is select a Default QuickBooks Ledger. This will ensure a default option will be applied if there are any unassigned SkySlope Books ledgers.

2. Next, you will use the drop-down menus to match the SkySlope Books Ledger ("Account Name") to the appropriate QuickBooks Ledger.

Once you've matched all of the ledgers, click Save.

If you are missing a ledger, please contact your SkySlope Books Customer Success Manager or SkySlope Books Support to complete the setup.
Invoice Integration
1. Similar to the Bills Integration, you must also select a default for Products/Services under Invoice Integrations. This will ensure any unassigned items are still transferred to QuickBooks.

2. Next, you will use the drop-down menus to match SkySlope Books Product/Service to the coordinating QuickBooks Product/Service.

Once you've matched all of the Product/Services, click Save.

If you are missing a specific Product/Service, please navigate to QuickBooks to create it. Then return to SkySlope Books to complete the setup.
Integration Settings
After completing the QuickBooks Integration setup, your next step is to determine how you would like to sync Bills/Invoices from SkySlope Books into QuickBooks! Learn how by clicking on the below article.
If you have any questions about the QuickBooks integration, please reach out to our SkySlope Books Support team!
Was this article helpful?
That’s Great!
Thank you for your feedback
Sorry! We couldn't be helpful
Thank you for your feedback
Feedback sent
We appreciate your effort and will try to fix the article
<\br>